
I Tried Phoenix Oil Sticks for the First Time — Here's Everything I Learned

Second Painting with Oilsticks after a huge learning curve.
Testing Phoenix Oil Sticks: What I Wish I Knew Before I Started
When Phoenix reached out to sponsor a video on their new water-soluble oil sticks (released in September 2024), I was genuinely curious—especially since I hadn’t tried oil sticks at all before. I wanted to approach this like a true beginner and document the whole process—what surprised me, what worked (and what didn’t), and all the things I wish I had known from the start.
To be honest, this ended up taking way more time than I imagined. What started as a quick test on watercolor paper turned into two weeks of swatching, experimenting, and troubleshooting. There were some early wins—and a lot of “why is this clumping so badly?” moments. But eventually, I got the hang of it. And through it all, I learned a lot.

From my Basquiat-inspired study created during this testing process — now available for purchase! (Took me 5 months to decide to let it go;))
What Are Oil Sticks (and Oil Pastels)?
Oil sticks are basically oil paint in stick form, made with wax and pigment—meant to be used without a brush or palette. Unlike oil pastels (which never truly dry), oil sticks dry and cure just like traditional oil paint. Oil pastels are softer, waxier, and best used for layering and sketching—but they don’t have the same archival permanence.
Historically, oil pastels were first created in 1925 by Sakura (Crepas), and then Sennelier’s more professional oil pastels came out in 1949, commissioned by Pablo Picasso himself. Oil sticks emerged later in the 1950s and gained more popularity thanks to artists like Jean-Michel Basquiat, who famously used them for their directness and raw energy.


First Impressions
I started swatching on watercolor paper (not primed), just to get a feel. I created a swatch sheet for each color: the far left is the stick applied thick and dry, the far right is diluted with water. Eventually, I added a middle column (on the second sheet) showing how it blends when white is added.
Note: I accidentally swapped the Cobalt Violet Hue and the Phoenix Violet in the white blend swatches—those two are mislabeled, but the rest are accurate.
Some colors felt amazing—light colors like white, yellow, and orange spread beautifully. Others, like Raw Umber, Burnt Sienna, and deeper tones, clumped up badly. At first, I thought it was the formula... but turns out: it’s probably the paper. These sticks really need a primed surface, otherwise the pigment gets stuck.

My second “explorations” after having done the first painting…
Tips for Using Oil Sticks
Cut off the wax layer before using—it’s a protective coat that blocks blending.
Warm up the sticks by letting them sit in warm water—it helps soften them for better application.
You can use oil painting tools with them: brushes, palette knives, even linseed oil or solvent-free gel.
They’re especially great for drawing in details or sketching outlines.
Not ideal for covering large areas—they work better for line work and texture.
You can layer them over oil pastels, but not the other way around (it doesn’t grip as well).

(Image here showing: Left — oil stick over oil pastel, Right — oil pastel over oil stick)
Oil Stick vs. Oil Pastel Layering Test 🧪
I ran a quick test to see how oil sticks and oil pastels layer together. The result? Oil stick over pastel felt gritty and uneven, but layering pastel over oil stick was surprisingly smoother and easier to control.
That said—you might be wondering: Why even combine them? After all, oil pastels never fully dry, while oil sticks do(eventually). It’s true—this combo isn’t archival or standard practice, but if you're experimenting or sketching and not worried about long-term stability, using both can give you interesting textures and mark-making options. Just keep in mind that the underlying surface (especially if it's gessoed) makes a huge difference.
If you do mix them, go pastel on top of oil stick, not the other way around.
Once I Switched Surfaces
Things improved a lot once I gessoed the watercolor paper and warmed the sticks. Even the clumpier colors behaved better. The paint spread more smoothly, blended well with water, and I could layer more easily. If you’re coming from watercolor like me, this takes adjusting—but it’s worth it.
Drying Time
One of the big questions I had: how long do these actually take to dry?
Here’s what I found:
Watery washes dried in about 1 day (~68°F / 20°C).
Normal applications: 5 days.
Thick areas: 7+ days.
These are oil-based, so give them time like traditional oils.
This will of course vary depending on your climate and surface, but definitely don’t expect these to dry like watercolors. These are oil-based, so treat them as such—especially if you’re planning to scan or frame your work.

My first attempt with Oil Sticks
The Painting Process
The first painting was a complete disaster. I think the main reason was because I tried to use oil sticks that weren’t warmed at all, and because I wanted to create a certain color, I ended up chopping up the sticks, mixing them on a palette, and using a paintbrush to apply the paint. That defeated the whole purpose of using oil sticks and made the process frustrating. I even reached for things like Gamblin's solvent-free gel and safflower oil to fix the clumping, which helped—but it made everything more complicated. Honestly, it didn’t make any sense to me. If I’m going to go through all that, why not just use oil paint from a tube?
But it’s almost like I had to go through that mess to fully understand the medium in this format. Once that was out of my system, I gave myself time to just explore and play with the sticks. That led me to paint a study of Basquiat’s “Riding Death”—though mine became a feminine reinterpretation titled “Riding Life.”
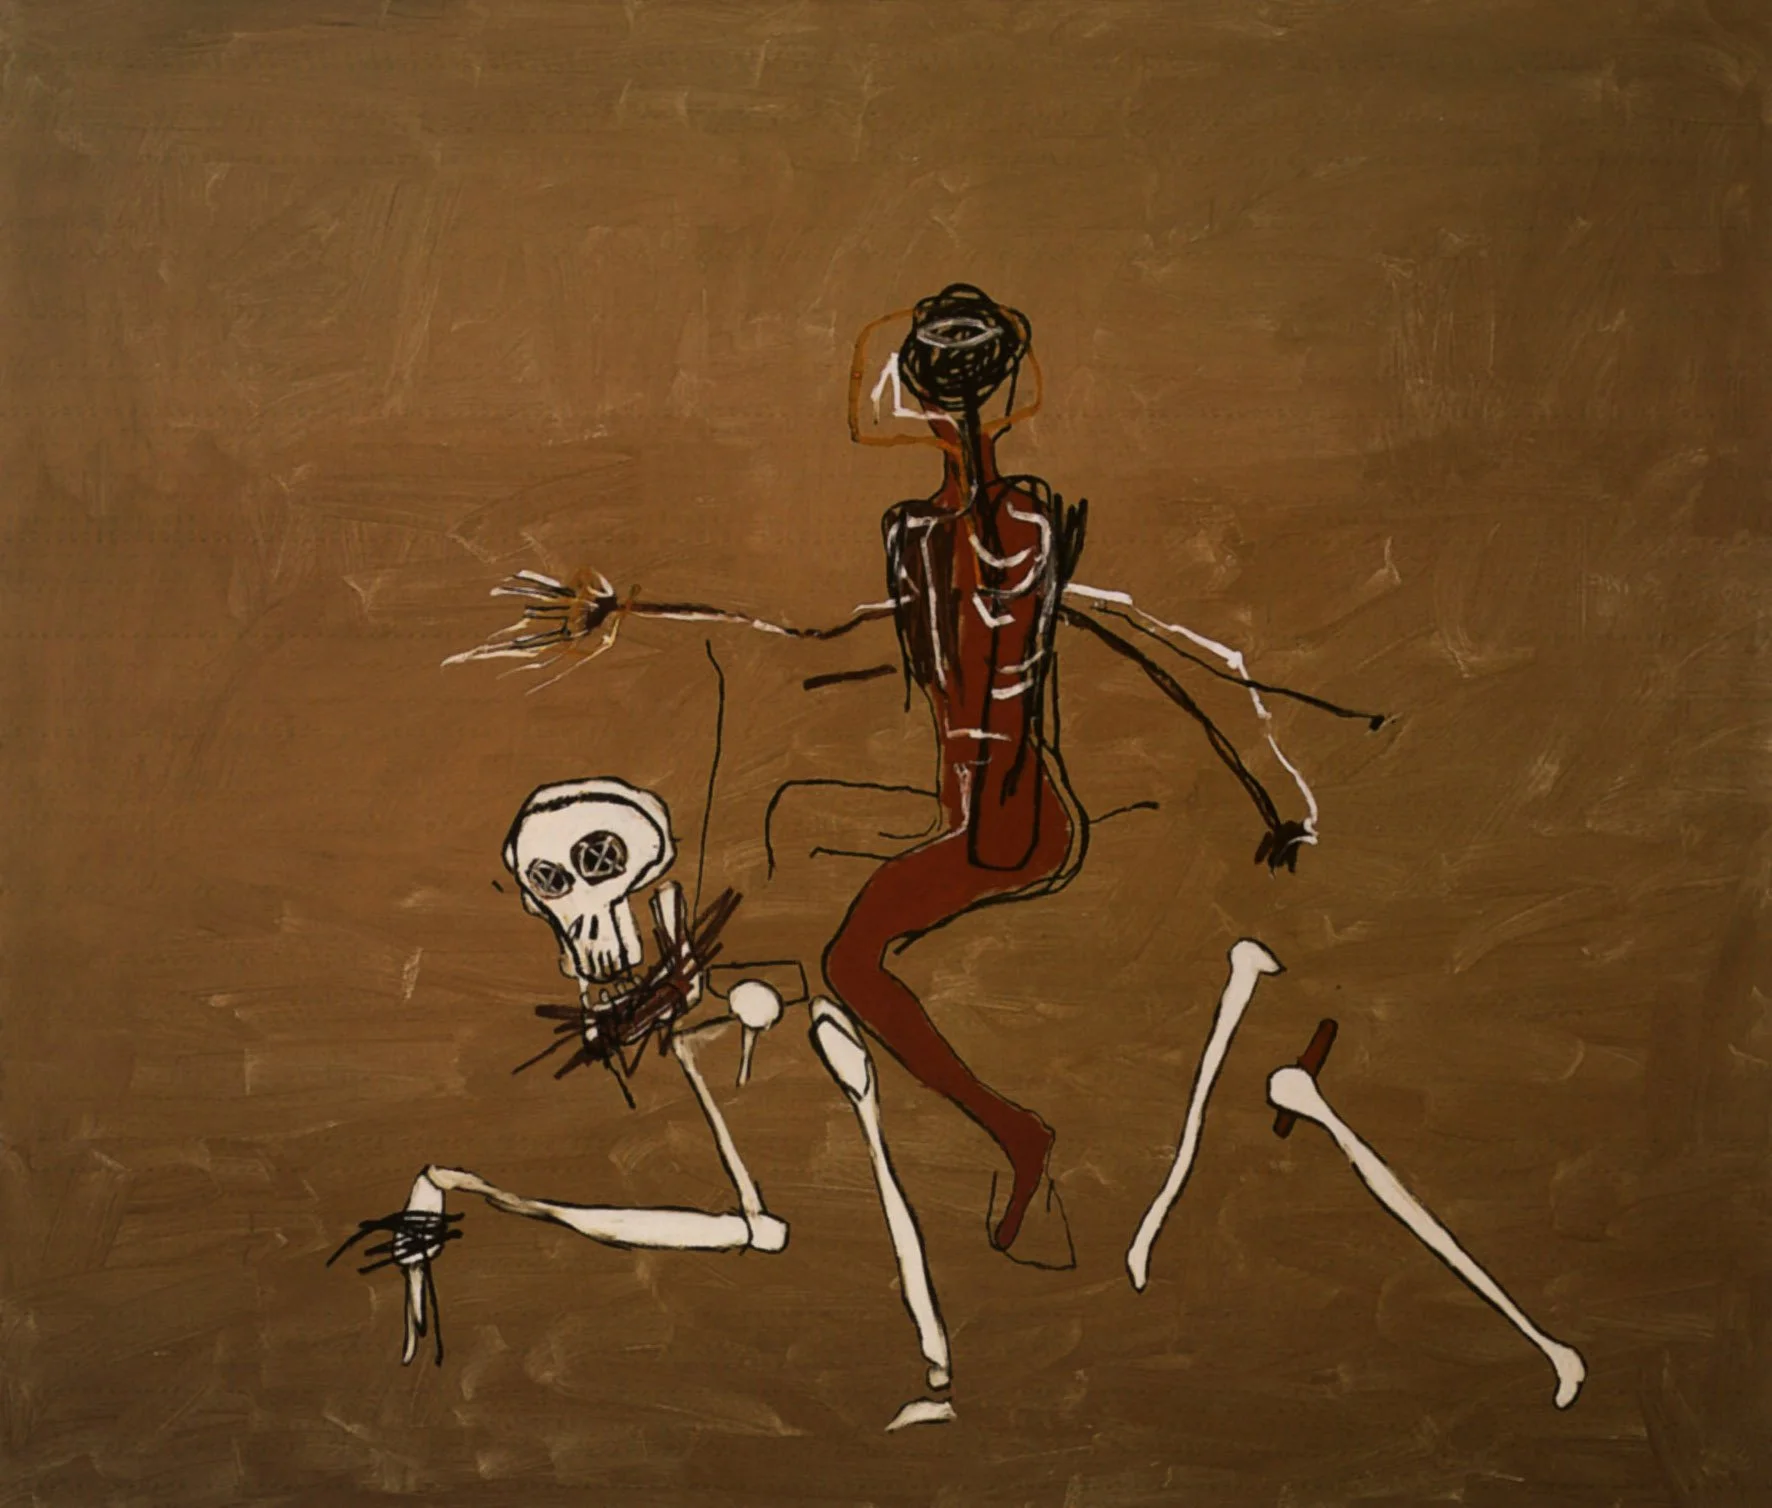

I chose that study because I figured it made more sense to study someone who used oil sticks fluently. I began by scraping off the peeled wax and diluting it with water to create a background wash. This time, I made sure to warm the sticks beforehand—huge difference. I applied three colors directly onto the background, let them dry, and then used the oil sticks to sketch the main figure. That was the moment the sticks really shined for me.
Painting within the sketched lines felt much smoother, though the small 16x12 size made it hard to get super fine, pen-like lines like Basquiat’s. I eventually used a small fine-point brush for details. For the flowers on top of the figure’s head, I had to mix paint on a palette and use a palette knife to apply them. But overall, this painting felt way easier—and I actually enjoyed it.
Pros & Cons (My Honest Take)
Pros:
Direct and intuitive for sketching
Water-soluble—no need for harsh solvents
Portable and less messy
Great pigment labeling and packaging (cylinders, pigment info, etc.)
Cons:
Learning curve with surface and prep
Not great for covering large areas
Needs warming and wax scraping for best use
Shiva sticks felt creamier out of the box, but Phoenix has the advantage of better labeling, water-solubility, and easier wax wrap removal. Once I adapted, I really appreciated what these could do.
Final Thoughts + Video
You can watch the full video here:
🎥 Oil Sticks for Beginners: Testing Phoenix Water-Soluble Oil Sticks (+ What I Wish I Knew)
This video goes through:
Swatches and how they behave with water
Techiniques you can try with Oil Sticks
Tips I wish I knew from the start
Basics like what are oil sticks? Since when were they around? The difference between oil pastels and oil sticks? A bit of History?
Honest thoughts after 5–6 hours of use
Where to Buy
If you’re curious to try them, here’s the link! It helps support me create content:)):
Amazon (15% off code: L2WPY7DS): https://amzn.to/3ZlTQiq